

A swimming pool that keeps losing water is one of the most worrying problems a villa owner in Dubai can face. The level drops a little every day, the top-up runs more often, and the question nobody can answer straight away is whether the pool is actually leaking or whether the Dubai heat is simply doing what it always does. That uncertainty is exactly why leak repair has to start with diagnosis, not with digging. A leak fixed in the wrong place is not a repair at all — it is a bill for work that never addressed the problem, and the water keeps dropping afterwards.
This guide explains swimming pool leak repair in Dubai in full: how to tell a real leak from evaporation, how a professional detection visit works, how each type of leak is actually fixed, whether your pool will need draining, how long each repair typically takes, and what a proper warranty should say in writing. It answers the questions owners really ask — in community groups, in forums and on site visits — in detail, so that when someone quotes for the job, you can tell whether they have found the leak or are only guessing at it.
 Related reading: our renovation guide covers what to check when an older pool needs more than a repair, our pool cost factors guide explains what shapes a quotation, and our pool chiller guide covers year-round swimming comfort in Dubai heat. For ongoing care once a repair is proven, see our swimming pool cleaning in Dubai and swimming pool maintenance in Dubai services, and if you are weighing a new pool rather than repairing an old one, our swimming pool construction team covers the full build.
First, is it actually a leak? Evaporation in Dubai is not a small number
Before anyone talks about repair, the first job is to establish whether water is escaping through a fault at all. In Dubai, evaporation alone can be surprisingly large. A hot, dry, windy week, an uncovered pool, a heated pool running through summer — all of these pull water from the surface at a rate that would look alarming in a cooler climate. Many owners have paid for leak detection only to learn that their pool was simply evaporating, and many others have ignored a genuine leak for months because they assumed the heat explained it. The difference matters, because evaporation needs no repair and a leak only gets worse while it is ignored. The bucket test is the simple, reliable way to separate the two, and it is worth doing properly rather than roughly. Take a plain bucket, set it on a pool step so it sits partly submerged and stable, and fill it with pool water until the level inside roughly matches the level outside. Mark both levels precisely — a waterproof marker line on the inside of the bucket and another on the outside, or tape at the waterline — then leave the pool alone for a full day: pump running normally, no swimming, no backwashing, no topping up, and any automatic filler switched off. The bucket and the pool sit in the same sun, the same wind and the same air, so both lose the same amount to evaporation. If both levels drop by the same amount, the pool is losing water to the weather, not to a fault. If the pool level drops noticeably more than the bucket level, you have a leak, and the size of the difference tells you roughly how serious it is. Two refinements make the test far more useful. First, run it once with the pump on and once with the pump off, on different days. A leak that only appears with the equipment running usually sits on the pressure side of the plumbing — a return line or a fitting that only opens up under pressure — while a leak that continues with everything off usually sits in the shell or on the suction side. Second, watch where the falling level stops. Water that stabilises at the bottom of the skimmer mouth points at the skimmer or the filtration system. Water that stops at a light fitting points at the light. Water that keeps falling past every fitting, down towards the floor, points at the shell or the main drain. That single observation often narrows a whole pool down to one suspect area before any instrument comes out of its case. There are other clues worth noting before you call anyone. Wet or sinking ground near the pool, a patch of lawn that stays green while the rest dries, or dampness on the plant-room floor all suggest water going somewhere it should not. Air bubbles in the pump basket or in the return jets while the pump runs suggest a suction-side leak pulling air into the system. A filter pressure reading that creeps up, or a pump that keeps losing its prime, points the same way. None of these proves the location on its own, but together they give a detection technician a much shorter list of suspects, and a shorter list means a faster, cheaper visit.How a proper diagnosis works: dye, pressure and underwater inspection
A professional leak detection visit is a sequence, not a single test, and understanding the sequence helps you judge whether the person you hired is being thorough. It typically begins with a visual inspection: the waterline tiles, the grout, the skimmer throat, the light fittings, the return jets, the main drain cover and the plant room, looking for cracks, gaps, loose fittings and debris sucked into a void. Debris caught in a crack is a surprisingly reliable sign, because moving water pulls small particles into the leak path. Next comes the dye test, which is the most direct way to confirm a suspected shell or fitting leak. With the pump off and the water completely still, a technician releases a small amount of coloured dye near the suspect crack or fitting and watches what the water does with it. If there is a leak, the dye is drawn in a visible thread towards the crack or gap — unmistakable when it happens, and no interpretation required. If the dye hangs in the water and drifts away, that spot is not leaking, and the search moves on. The test only works in still water, which is why a good technician insists on the pump being off and waits for the surface to settle; dye released into moving water gives false readings and sends everyone chasing a leak on the wrong wall. Pressure testing covers what the dye test cannot: the buried pipework. Each plumbing line is isolated in turn and put under pressure, and a line that will not hold its pressure has a break somewhere along its length. Acoustic listening equipment can then narrow the break down further, picking up the sound of escaping water through the deck or soil without digging. Where a line is accessible, a camera inspection can confirm the fault directly. The point of this sequence is that it finds the leak before anyone lifts a tile or cuts a deck. Blind digging — opening up the garden on a guess — is the most expensive way to find a leak and the least reliable, and a contractor that wants to start digging before testing has the order backwards. One honest caveat: a pool can have more than one leak. Fixing the first one and stopping there is how owners end up calling the same company back a month later. A thorough visit re-tests after the first fault is found, and a thorough repair is always followed by a retest — the level marked, the pump run, the pressure checked — before the job is called done. If your technician packs up without proving the repair held, the job is not finished, whatever the invoice says.Structural crack repair: the repair Dubai owners ask about most
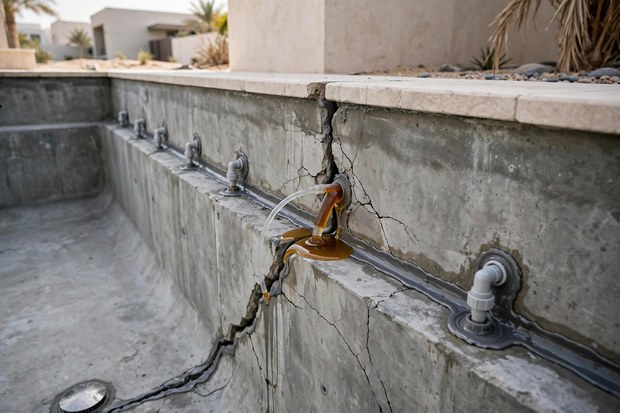
A crack in the pool shell is the repair owners worry about most, and rightly so, because it is the one that can grow. Not every crack is structural — hairline surface cracks in plaster or render are common and often cosmetic — but a crack that runs through the shell, leaks water, or keeps getting longer is a structural problem, and it needs a structural answer. The usual cause in Dubai is ground movement: sandy soils, settlement, and changes in groundwater put stress on a rigid concrete shell, and a shell that cannot flex will crack at its weakest point. That is why a good repair starts by asking what moved and whether it has finished moving, not just by filling the visible line. The standard repair for a genuine structural crack is methodical. The crack is opened up along its length — commonly routed into a V-shaped groove — so the repair material can lock mechanically into the shell rather than sitting as a skin on the surface. Loose material is cleaned out, the groove is dried, and a two-part epoxy is injected or troweled into the full depth of the crack, where it cures into a hard, waterproof plug. Where the crack is still active — still moving — a flexible material is chosen instead, because a rigid plug in a moving crack simply cracks again beside the repair. In more serious cases, the repair is reinforced: steel bars bonded across the crack, commonly called stitching, carry load across the fault and stop it opening further. The finished repair is then sealed with a waterproof membrane layer and refinished with plaster or tile to match the surrounding surface, so the pool keeps its look as well as its water. Two things separate a lasting structural repair from a quick one. The first is curing: epoxy, membrane and plaster each need their full curing time, and a repair refilled too early is a repair that will fail at the bond line. The second is the cause. If the ground beneath the pool is still settling, or if a hydrostatic valve — the valve that relieves groundwater pressure from beneath the shell — has failed, sealing the crack without addressing the pressure behind it only moves the failure somewhere else. A contractor that talks about the cause, not just the crack, is the one whose repair is likely to last.Skimmer throat resealing: the slow leak most owners miss
If there is a single most common leak in a concrete villa pool, it is the skimmer throat — the joint where the plastic skimmer meets the concrete shell. Plastic and concrete expand and contract at different rates in Dubai heat, and over years of daily cycles the joint between them opens up. The leak that follows is slow, quiet and easy to miss: the water level drops a little faster than evaporation explains, the bucket test says leak, and nothing looks wrong until someone inspects the throat closely. Many owners live with this leak for months, topping up and blaming the weather, while water quietly escapes behind the pool wall. The repair depends on how far the joint has gone. A small separation can be resealed: the joint is cleaned, dried as far as possible, and bonded with a proper pool sealant or epoxy, rejoining the skimmer to the shell. A badly cracked skimmer body, or a throat that has separated widely, needs the skimmer replaced — a bigger job that involves cutting back the surrounding area, fitting the new unit, and re-bonding it to the shell so the joint is sound from the start. What does not work, except as a very short-term measure, is smearing putty over the surface of a leaking joint and hoping it holds. Surface putty over a moving joint is a temporary patch, and it will peel or crack as the joint moves again. If a contractor offers putty as the permanent answer to a skimmer throat leak, ask what happens when the joint moves next summer — because it will. One practical note: a skimmer leak usually needs the water lowered to just below the skimmer mouth while the work is done, which is a partial lowering rather than a full drain. The pool stays mostly full, the work stays accessible, and the refill afterwards is small. That is one reason skimmer resealing is among the quicker professional repairs, provided the diagnosis was right in the first place.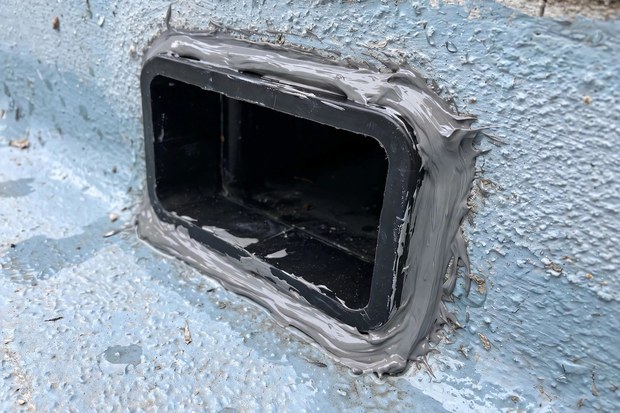
Pipe and fitting repairs: finding the break without digging up the garden
Underground pipe leaks are the jobs owners dread most, because they imagine the whole garden being dug up. In practice, a properly diagnosed pipe leak is a local job. Pressure testing identifies which line is losing pressure; acoustic listening or camera inspection narrows the break to a section; and the excavation is then limited to that section only. The faulty length of pipe is cut out and replaced, the joints are remade, and the line is pressure tested again before anything is backfilled. Backfilling over an untested repair is how a second excavation happens, so the retest is not optional — it is the step that makes the first excavation the last one. Fittings fail too, and they are usually simpler. A cracked return eyeball, a loose skimmer faceplate, a perished pump lid seal or a weeping union fitting can all lose water steadily while looking minor. These are often the cheapest repairs in a leak job, and they are worth checking first: a technician who replaces a pump lid seal and retests before proposing a pipe excavation is doing you a favour. The same applies to the backwash line, which is a frequent and frequently overlooked source of steady loss — water running to waste when it should not be is easy to spot once someone thinks to look at it. What decides whether a pipe repair is quick or involved is access. A line running under open soil is straightforward. A line running under a tiled deck, a driveway or a built structure takes longer, because the surface has to be opened and restored properly afterwards. That is also where honest communication matters most: a contractor should show you where the break is, explain how much surface has to come up, and show you the pressure test result before and after. If the plan is vague about location, the digging will be vague too, and vague digging is expensive digging.Underwater light niche leaks: small fitting, serious consequences
Pool lights leak more often than owners expect, and they deserve more respect than they usually get, because a light leak sits at the meeting point of water and electricity. The usual fault is the gasket between the light fitting and the niche, or the conduit — the pipe that carries the light cable back to the junction box — which can crack, separate from the niche, or lose its seal over time. Water finds the gap, the level drops, and the dye test at the light fitting pulls dye straight into the niche. A leak that stabilises exactly at the light fitting is the classic sign. The repair starts with isolating the electrics. Power to the light circuit is switched off and verified off before anyone works on the fitting, and any repair that involves wiring is work for someone qualified to handle it — this is not a job to improvise. With the electrics safe, the light is removed, the niche is inspected, the gasket is replaced or the conduit seal renewed with pool putty, butyl tape or a cord stopper as appropriate, and the fitting is refitted and tested. Where the conduit itself has broken away from the niche, the repair is more involved and may need the niche area opened up, but the principle stays the same: seal the path water is taking, then prove it with a dye test before the light goes back into service. The safety point is worth stating plainly. A leaking light fitting is not just a water-loss problem; it is an electrical fitting sitting in water with a compromised seal. If you suspect a light leak, switch that light circuit off and leave it off until the fitting has been inspected. It is a small precaution that removes a real risk, and it costs nothing.Tile, grout and plaster repairs: the visible leaks
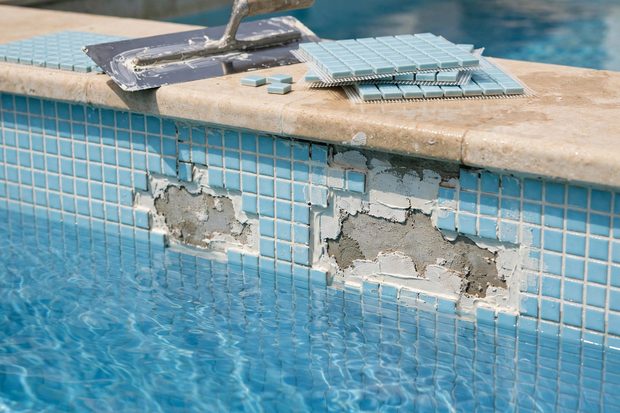
Not every leak hides underground. Some are right in front of you: loose tiles at the waterline, grout that has washed out of its joints, plaster that has gone rough, pitted or hollow-sounding when tapped. Water gets behind a loose tile, works along the joint, and finds its way through the shell surface. Left alone, a small area of failed grout becomes a larger area of loose tiles, and a larger area of loose tiles becomes a resurfacing job. These are the repairs where early action genuinely saves money, because the fix for a few tiles is a visit, while the fix for a whole waterline is a project. The repair itself is straightforward when the damage is local: the loose tiles are removed, the surface behind them is cleaned and prepared, the tiles are re-fixed and the joints are re-grouted with waterproof grout. Where tiles can be matched, the repair blends in; where an older tile has been discontinued, a good contractor will say so honestly and discuss the closest match rather than promising an invisible repair it cannot deliver. Plaster repairs follow the same logic: the failed area is cut back to sound material, patched, and finished to match, with the understanding that a patch is a patch — it restores the surface and stops the leak, but it will not always be indistinguishable from the original finish. Some tile and grout work can be done without draining, using underwater repair materials that cure while submerged. That suits small, well-defined faults. Larger areas, or work that needs a dry, prepared surface for a proper bond, need the water lowered past the repair zone. A contractor that insists on a dry surface for a large repair is not padding the job; it is protecting the bond that makes the repair last.Waterproofing membrane application: the layer that makes repairs last
Behind every lasting leak repair sits a waterproofing layer, and it is the step most often skipped by quick-fix operators. A waterproofing membrane is a continuous, flexible coating applied to a correctly prepared shell, and its job is simple: even if a hairline crack opens later, the membrane bridges it and keeps the water in. It is applied after the structural repair and before the finish — tile, plaster or render — so it sits protected between the shell and the surface you see. Applied properly, it is the difference between a repair that holds for years and one that weeps again within a season. Preparation is what makes or breaks a membrane. The surface must be sound, clean and correctly profiled; loose material, dust and contamination all weaken the bond, and a membrane bonded to a weak surface will peel with the surface it sits on. Joints, corners and penetrations — where pipes and fittings pass through the shell — need particular care, because these are the points where movement concentrates and where a membrane is most likely to fail if it is thin or bridged poorly. Application itself is typically done in more than one coat, with curing time between coats, and the finished membrane is then proven with a water test: the shell is filled, the level is marked, and the level is watched. A membrane that passes a standing water test before tiling is a membrane you can trust; a membrane tiled over untested is a hope, not a repair. This is also why the cheapest repair quote is often the most expensive one in the end. Membrane, preparation and water testing are invisible on handover day, which makes them easy to leave out of a low quote — and their absence only shows up months later, as a leak returning in the same place. When you compare repair proposals, ask each contractor to name the membrane system, the preparation steps and the water test it will run. A contractor that answers in specifics has a system. One that waves the question away is selling you a surface, not a repair.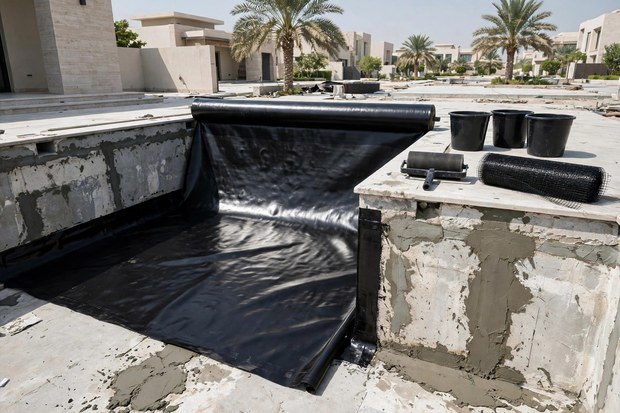
Does the pool have to be drained?
This is the question almost every owner asks first, and the honest answer is that it depends entirely on where the leak is. Many repairs do not need a full drain at all. Tile and grout work near the waterline, skimmer resealing, light niche work and most plumbing repairs need the water lowered only past the repair zone, or not lowered at all — the faulty line is simply isolated while the rest of the pool stays full. Equipment leaks in the plant room never need the pool drained. Underwater repair materials can even handle small, well-defined faults with the pool completely full. Structural work is different. A shell crack repair, a membrane application and any replastering need a dry, prepared surface, and that means draining — sometimes fully, sometimes to below the repair area. Draining also adds time beyond the repair itself: the emptying, the work, the curing, and then a slow, controlled refill, because a rapid refill after structural work can stress a fresh repair. There is also a safety consideration owners rarely hear about: an empty pool in an area with high groundwater can be lifted or cracked by water pressure from below, which is why a hydrostatic valve matters and why draining should be planned, not improvised. A contractor that drains without checking groundwater conditions is taking a risk with your shell. So when a contractor tells you the pool must be drained, ask why — which repair, at which level, needs the dry surface? And when a contractor promises a repair with no draining at all, ask the same question in reverse: will the repair material bond properly to a wet surface, and how will the bond be proven? Both answers are sometimes right. The right one is the one that matches the leak you actually have.How long does a leak repair take?
Timelines follow the leak type, and any contractor that gives you a single number before diagnosing the leak is guessing. A fitting replacement, a pump seal or a small tile repair is commonly a short visit. A skimmer reseal or a light niche repair is commonly a day’s work including the partial lowering and the retest. A pipe section replacement takes longer, because locating, excavating, replacing and pressure testing happen in sequence, and restoring the surface afterwards adds its own time. Structural repairs take the longest of all: draining, crack preparation, injection or stitching, membrane application, curing between stages, refinishing and a slow refill all happen in order, and none of those stages can be hurried without weakening the result. Curing time is the part owners most often underestimate, and it is the part that most often decides whether a repair lasts. Epoxy, membrane, grout and plaster each have a curing window set by their chemistry, and refilling or stressing the repair inside that window breaks the bond while it is still forming. A contractor that promises to drain, repair, refill and hand back a structural repair in a single rushed visit is not being efficient; it is skipping the chemistry. Ask for the sequence in writing — what happens on each visit, what cures between visits, and when the retest happens — and judge the timeline by whether it respects those stages. A realistic timeline that includes curing is worth more than a fast one that ignores it. Two further factors commonly extend a job. The first is finish matching: tracking down a discontinued tile, or replastering a section to blend with an older surface, takes longer than a plain epoxy seal, and the finish is what you will look at every day. The second is discovery: opening up a repair area sometimes reveals a second fault — a second crack, a corroded fitting, a void behind the shell — that was invisible until the first repair exposed it. A good contractor flags this possibility upfront, shows you what it finds, and agrees the extra work with you before doing it, rather than presenting it as a surprise at the end.Repair, renovation, or something bigger?
Every leak repair ends with a judgement call: is this fix enough, or is the pool telling you it needs more? A single, well-defined fault — a skimmer joint, a fitting, a short pipe section — is a repair, and a good repair ends the story. But when faults keep appearing in different places, when the shell has multiple structural cracks, when the tile and grout are failing across the whole waterline, or when the plant room equipment is failing alongside the shell, the honest answer may be renovation: resurfacing, retiling, replumbing or re-waterproofing as a single planned project rather than a series of emergency visits. Renovation costs more in one go, but it stops the cycle of call-outs, and it gives you a pool with a single warranty covering the whole renewed system rather than a patchwork of small guarantees. There is also a rarer, more serious case worth naming: a shell that has moved significantly, or that has lost structural integrity across a large area, may need structural remediation beyond a standard repair — engineered reinforcement, partial rebuild, or in extreme cases a new shell. That is not a decision to take from a single site visit, and a responsible contractor will say so, involving structural assessment before proposing that scale of work. The warning sign here is the opposite: a contractor that proposes a rebuild for a single crack, or a patch for a shell that is clearly failing, has not matched the solution to the problem. The right scope follows the diagnosis, not the other way round. A useful rule of thumb: if the same pool has needed three separate leak repairs in different places within a short period, stop repairing individual faults and ask for a full assessment — shell, plumbing, fittings and plant together. Patterns like that usually mean a systemic cause, such as ground movement, ageing pipework or a failed waterproofing system, and treating the system is cheaper than treating its symptoms one by one. Our renovation guide explains what a full renovation covers and what to check before committing to one.Warranty on repair work: what to get in writing
A repair without a written warranty is a promise with no address. Before work starts, get the warranty in writing, and make sure it names what it covers, for how long, and what would void it. A structural repair warranty should cover the repaired crack and the membrane system around it; a fitting warranty should cover the replaced part and its joints; a pipe repair warranty should cover the replaced section and its pressure test result. Each of these is different, and a single vague line covering “the repair” usually covers less than owners assume when they come to claim. Read the exclusions with the same care as the coverage. Common exclusions include further ground movement, damage from later alterations, poor water chemistry left uncorrected, and servicing by unqualified hands — all fair, but all worth knowing before you sign rather than after a claim is refused. Also confirm who honours the warranty: the company that did the repair, or a third party you have never met. A warranty honoured by the company that knows your pool, with a named contact and a response commitment, is worth considerably more than one that sends you to a call centre. And keep the paperwork: the diagnosis report, the pressure test result, the membrane specification and the retest record are the evidence that turns a warranty from a paragraph into a claim you can actually make. Finally, remember that a warranty is only as good as the retest behind it. The strongest warranty document in the world means little if the repair was never proven to hold before handover. Insist on the retest — level marked, pump run, pressure checked, dye test repeated at the repaired fitting — and ask for the result in writing. That single record protects you twice: it proves the repair worked on the day, and it gives you the baseline for any future claim.Frequently asked questions
How do I know if my pool is leaking or just evaporating?
Run the bucket test: set a bucket of pool water on a pool step, mark the levels inside and outside, and leave it for a full day with the pump running normally, no swimming, no backwashing and no topping up. If both levels drop by the same amount, the loss is evaporation. If the pool level drops noticeably more than the bucket level, you have a leak. Running the test once with the pump on and once with it off also tells you whether the leak is on the pressure side of the plumbing or in the shell, which narrows the search considerably.What does a professional leak detection visit involve?
A proper visit follows a sequence: a visual inspection of the waterline, skimmer, lights, returns and plant room; a dye test at each suspect crack or fitting, done with the pump off and the water still; and pressure testing of each plumbing line in turn, with acoustic listening or camera inspection to narrow down any buried break. The aim is to find the leak before anyone lifts a tile or digs, and to retest after the first fault is found, because a pool can have more than one leak. If a contractor wants to start digging before testing, the order is backwards.Can a pool leak be repaired without draining the pool?
Often, yes. Tile and grout work, skimmer resealing, light niche repairs and most plumbing repairs need the water lowered only past the repair zone, or not lowered at all, and underwater repair materials can handle small, well-defined faults with the pool full. Structural crack repair, membrane application and replastering are different: they need a dry, prepared surface, so the pool is drained to below the repair area or fully, followed by a slow, controlled refill. Whether draining is needed depends entirely on where the leak is, so be wary of any answer given before the leak has been found.How long does a swimming pool leak repair take?
It depends on the leak type. A fitting replacement or a small tile repair is commonly a short visit, a skimmer reseal or light niche repair is commonly a day including the partial lowering and retest, and a pipe section replacement takes longer because locating, excavating, replacing and pressure testing happen in sequence. Structural repairs take the longest, since draining, crack preparation, injection or stitching, membrane application, curing between stages, refinishing and a slow refill all happen in order. Curing time cannot be hurried without weakening the repair, so a timeline that respects those stages is more trustworthy than a faster one that ignores them.What is the best way to repair a structural crack?
For a genuine structural crack, the standard repair is to open the crack along its length, clean and dry it, and inject or trowel a two-part epoxy into its full depth, where it cures into a hard, waterproof plug. Where the crack is still moving, a flexible material is chosen instead, and seriously cracked shells may be reinforced with steel bars bonded across the crack. The repair is then sealed with a waterproofing membrane and refinished, and — critically — proven with a standing water test before tiling. Surface putty smeared over a structural crack is not a repair; it is a coating that will fail when the crack moves again.Why do skimmer throats leak so often in Dubai?
The skimmer throat is the joint between a plastic skimmer and a concrete shell, and the two materials expand and contract at different rates in Dubai heat. Over years of daily cycles, that joint opens up and water escapes slowly behind the pool wall — a quiet leak that many owners mistake for evaporation for months. Small separations can be resealed and bonded, while a badly cracked skimmer body needs replacement and re-bonding to the shell. Because the repair usually needs the water lowered only to just below the skimmer mouth, it is among the quicker professional repairs, provided the diagnosis was right first.Is a leaking pool light dangerous?
It can be, because it is an electrical fitting sitting in water with a compromised seal. The usual fault is the gasket between the light and its niche, or the conduit carrying the cable back to the junction box. If you suspect a light leak, switch that light circuit off and leave it off until the fitting has been inspected, and leave any work involving wiring to someone qualified to handle it. The repair itself — gasket replacement or conduit resealing, followed by a dye test — is routine, but the safety precaution costs nothing and removes a real risk.When is renovation the right answer instead of another repair?
When faults keep appearing in different places, when the shell has multiple structural cracks, when tile and grout are failing across the whole waterline, or when plant equipment is failing alongside the shell, a single planned renovation — resurfacing, retiling, replumbing or re-waterproofing — usually works out better than a series of emergency visits. A useful rule of thumb: if the same pool has needed three separate leak repairs in different places within a short period, ask for a full assessment of shell, plumbing, fittings and plant together, because a pattern like that usually means a systemic cause. Our renovation guide explains what a full renovation covers.What should a leak repair warranty say?
It should be in writing, and it should name exactly what is covered, for how long, and what voids it. A structural repair warranty should cover the repaired crack and the membrane system around it; a fitting warranty should cover the replaced part and its joints; a pipe repair warranty should cover the replaced section and its pressure test result. Confirm who honours the warranty — the company that did the repair, or a third party — and keep the paperwork: the diagnosis report, the pressure test result, the membrane specification and the retest record are what turn a warranty paragraph into a claim you can actually make.What should I do first if I think my pool is leaking?
Start with the bucket test to confirm whether the loss is a leak or evaporation, and note the clues: where the falling level stops, whether the leak continues with the pump off, and any wet ground, air in the pump basket or pressure changes in the plant room. Switch off any suspect light circuit, and avoid draining the pool yourself — an empty pool in an area with high groundwater can be damaged by pressure from below. Then get a detection visit that follows the proper sequence of visual inspection, dye testing and pressure testing, and ask for the repair plan and the retest in writing before work starts. For pricing, message Hello Landscaping & Pools LLC on WhatsApp and we will arrange a visit.Related reading: our leak finding guide covers tracing a leak to its source, our repair tips guide covers tiles, pumps and finishes, and our renovation cost guide explains when repair is no longer enough.